Reconditioning vs. Jump Starting: What’s the Difference and When to Use Each?
Reconditioning vs. Jump Starting
Reconditioning vs. Jump Starting. If you’ve ever been stuck with a dead car battery, your first instinct might be to grab the jumper cables. But jump starting isn’t always the best—or most permanent—solution. In fact, there’s another method that’s gaining popularity: battery reconditioning. Both approaches are useful in different situations, but knowing when to use one over the other can save you time, money, and headaches.
In this article, we’ll break down the difference between reconditioning and jump starting, explain how each works, and help you decide which method is best for your battery issues.
What Is Jump Starting?
Jump starting is a quick and temporary solution used to start a vehicle with a dead battery by connecting it to another power source—usually another vehicle or a portable jump starter. The live battery supplies the power necessary to start the engine, giving your alternator a chance to recharge the battery once the car is running.
How Jump Starting Works:
Jumper cables or a jump starter are connected to your dead battery and a live one.
The live battery supplies enough current to start your engine.
Once running, your alternator charges your battery again—assuming it’s still in good condition.
Pros of Jump Starting:
Fast and convenient
Requires minimal tools
Good for emergencies
Gets your car running immediately
Cons of Jump Starting:
Only a temporary fix
Doesn’t address the root cause of battery failure
Can be unsafe if not done correctly
Repeated jumps can damage electrical components
Jump starting is best used when your battery is drained due to lights being left on, cold weather, or sitting idle for too long—but not when the battery is damaged or severely degraded.
What Is Battery Reconditioning?
Battery reconditioning is a restorative process that aims to revive a weak or sulfated lead-acid battery so it can hold a proper charge again. Over time, car batteries lose capacity due to sulfation—a buildup of lead sulfate crystals that block the chemical reactions inside the battery.
A reconditioning charger uses controlled voltage pulses or desulfation technology to break down those crystals and restore battery performance. It’s not a quick fix like a jump start, but it can add months or even years to the battery’s life.
How Reconditioning Works:
A smart charger analyzes the battery’s condition.
If sulfation is detected, it enters a repair or reconditioning mode.
High-frequency pulses or controlled voltage cycles reduce crystal buildup.
The battery is then gradually recharged to full capacity.
Pros of Reconditioning:
Restores capacity in weak batteries
Saves money by avoiding early replacement
Eco-friendly (less battery waste)
Works automatically with smart chargers
Cons of Reconditioning:
Takes hours or days depending on battery condition
Doesn’t work on completely dead or physically damaged batteries
Requires a dedicated smart charger
Battery reconditioning is ideal if your battery is still intact but showing signs of aging, slow cranking, or weak voltage—even after charging.
Key Differences Between Reconditioning and Jump Starting
Feature
Jump Starting
Battery Reconditioning
Purpose
Start car temporarily
Restore long-term battery health
Time Required
Minutes
Several hours or longer
Tools Needed
Jumper cables / Jump box
Smart reconditioning charger
Effect on Battery
No improvement in battery health
Can improve or extend battery life
When to Use
Emergency starting only
Routine maintenance or weak batteries
Battery Condition Needed
Mostly dead but intact
Sulfated or aging but not physically damaged
In simple terms, jump starting is for emergencies, while reconditioning is for restoration and maintenance.
Reconditioning vs. Jump Starting When to Jump Start vs. Recondition
Understanding when to use each method can prevent further battery damage and help you get the best life out of your car battery.
Use Jump Starting When:
The battery died recently (e.g., you left headlights on overnight).
You’re stranded and need an immediate solution.
The battery was working fine days earlier.
You plan to drive immediately and let the alternator recharge the battery.
However, if your car keeps needing jump starts repeatedly, it’s a strong sign the battery can no longer hold a charge—and you should consider reconditioning or replacement.
Use Reconditioning When:
The battery is over 2–3 years old and showing signs of weakness.
Your multimeter shows low voltage (under 12.4V) even after charging.
The engine cranks slowly or electronics seem underpowered.
You want to avoid early battery replacement and save money.
Reconditioning is not suitable if the battery has physical damage, leaks, or a swollen case. In that case, recycling and replacing the battery is the safest option.
Can You Combine Both?
In some cases, you may use both jump starting and reconditioning to revive a battery.
For example:
Jump start a dead battery to get the car running.
Drive for 30+ minutes to recharge it slightly.
Use a smart reconditioning charger overnight to restore health.
This approach works well when the battery is weak but not completely dead, and you want to make it reliable again for everyday use.
Why Battery Health Matters
A failing battery doesn’t just make starting your car difficult. It can lead to:
Inconsistent engine performance
Damaged alternator from overwork
Poor fuel efficiency
Electrical issues and warning lights
By understanding the difference between reconditioning and jump starting, and using the right approach at the right time, you can avoid these problems and extend your battery’s lifespan by months or even years.
Final Thoughts
Jump starting and reconditioning serve very different purposes in car battery care. Jump starting is a quick fix, while reconditioning is a long-term solution aimed at battery restoration. If your battery is weak, don’t just rely on repeated jump starts—that’s only masking the real issue. Instead, invest in a smart reconditioning charger and take a proactive approach to battery maintenance.
Not only will this save you money, but it will also reduce stress and increase your car’s reliability—especially during cold mornings or long road trips.
Best Chargers for Reconditioning Car Batteries: Top Picks for 2025
Discover the best chargers for reconditioning car batteries. Learn which smart chargers revive dead batteries, prevent sulfation, and extend battery life. When your car battery starts showing signs of failure, most people assume it’s time to replace it. But with the right charger, you can often bring a dead or weakened battery back to life. Battery reconditioning is a smart, cost-effective way to extend the life of your lead-acid battery, and having the right charger for the job makes all the difference.
In this guide, we’ll walk you through the best chargers for reconditioning car batteries, how they work, and what features to look for. Whether you’re a DIY enthusiast or just want to save money on battery replacements, this article will help you choose the ideal charger to revive and maintain your battery.
What Is a Battery Reconditioning Charger?
A battery reconditioning charger, sometimes called a smart charger or desulfator charger, goes beyond just charging a battery. It uses microprocessor-controlled technology to detect battery health, apply the correct charging stages, and often includes a desulfation mode. This feature helps break down the lead sulfate crystals that form on the battery plates, restoring the battery’s ability to hold a charge.
Standard chargers simply pump current into the battery without regard for condition or chemistry. Reconditioning chargers monitor the voltage, temperature, and state of charge to extend battery life and even reverse damage in some cases.
Why You Need the Right Charger for Reconditioning
Not all chargers are suitable for reconditioning. In fact, using the wrong type of charger can overheat or permanently damage your battery. Reconditioning chargers are designed to:
Prevent overcharging through smart monitoring
Use pulsed or staged charging to remove sulfation
Automatically switch modes from bulk to trickle to maintain charge
Work with a range of battery types including AGM, gel, and flooded lead-acid
Choosing a high-quality charger means you can safely restore your battery multiple times, saving hundreds of dollars over the life of your vehicle.
Top 5 Best Chargers for Reconditioning Car Batteries (2025)
Let’s take a closer look at the top-performing chargers on the market this year, based on features, reliability, ease of use, and value.
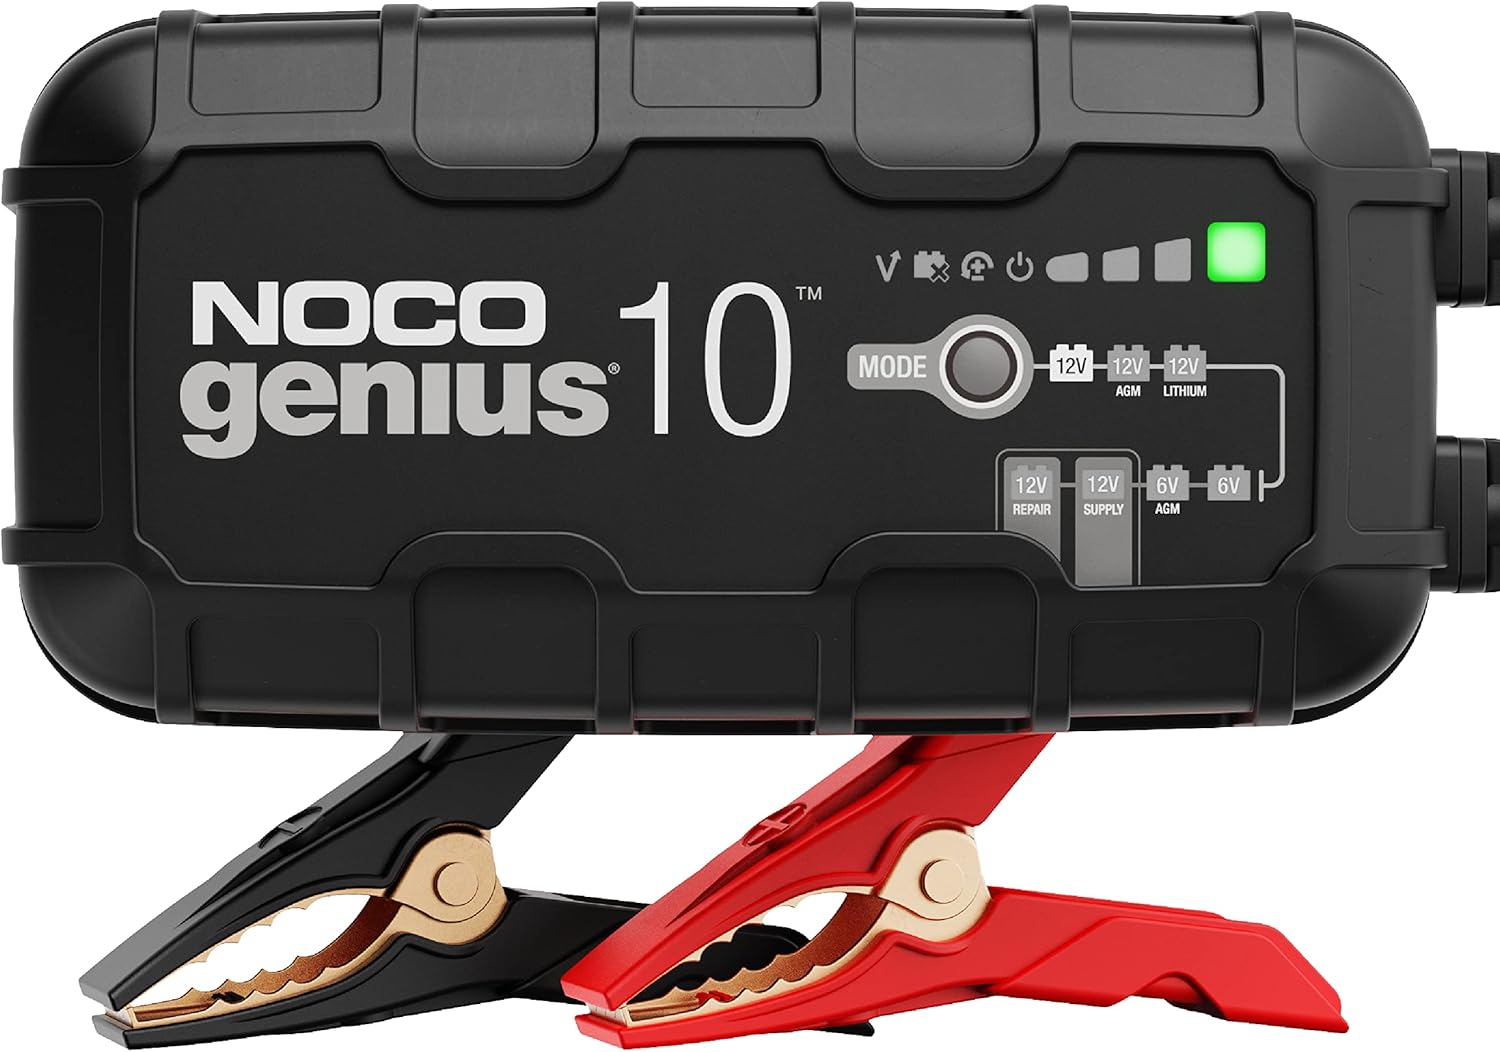
1. NOCO Genius10 – Best Overall Reconditioning Charger
NOCO Genius10 – Best Overall Reconditioning Charger
Amperage: 10A Battery Types: AGM, lead-acid, lithium, gel Price: $$$
The NOCO Genius10 is one of the most advanced battery chargers for both professionals and casual users. It features automatic desulfation, thermal compensation, and battery repair mode, making it ideal for reconditioning older or sulfated batteries. Its sleek design, built-in safety features, and ability to charge nearly any 6V or 12V battery make it a favorite across the automotive industry.
Why It Stands Out:
Precision charging with dynamic monitoring
Fully automatic repair mode for battery rejuvenation
Compact and rugged for long-term use
Best For: DIY users and professionals who want a reliable, multi-purpose charger that excels at battery recovery.
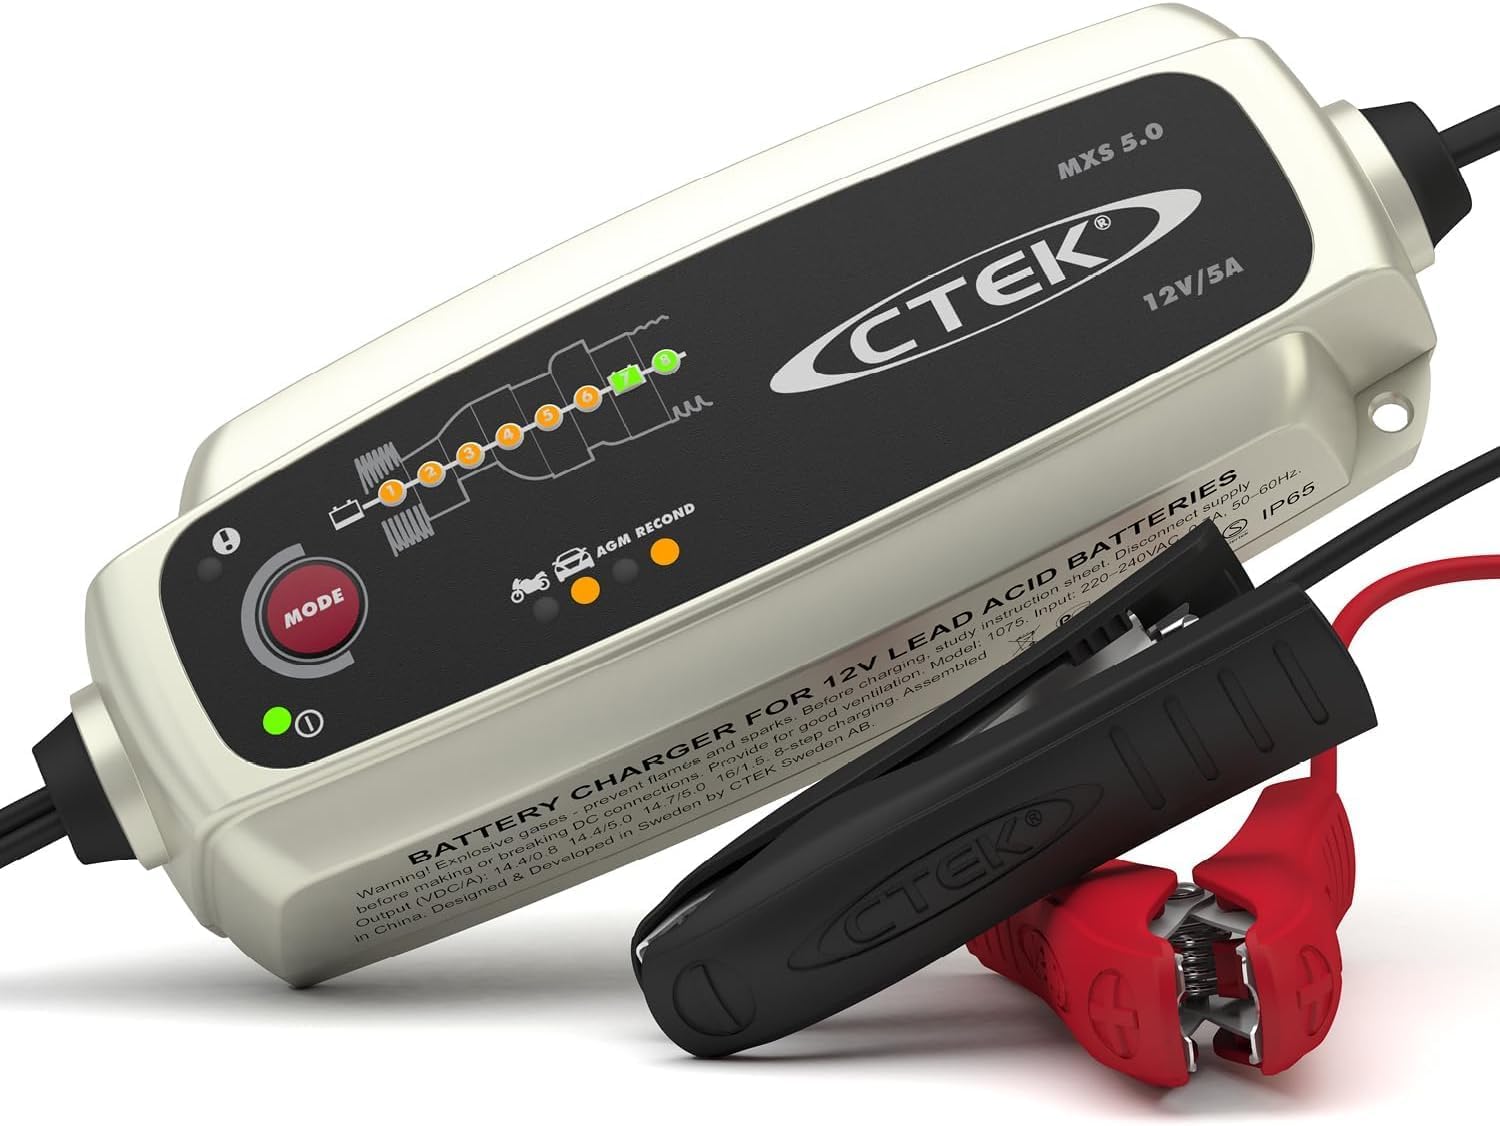
2. CTEK MXS 5.0 – Best for Smart Charging and Reconditioning
The CTEK MXS 5.0 is another top-rated smart charger known for its patented 8-step charging process. It includes a recondition mode, designed to restore deeply discharged batteries. The charger is easy to use and very safe, offering reverse polarity protection, spark-proof technology, and automatic temperature compensation.
Why It Stands Out:
Industry-leading multi-stage charging
Battery desulfation and reconditioning built-in
Trusted by luxury auto manufacturers
Best For: Car owners who need safe, hands-off charging and maintenance with minimal user intervention.
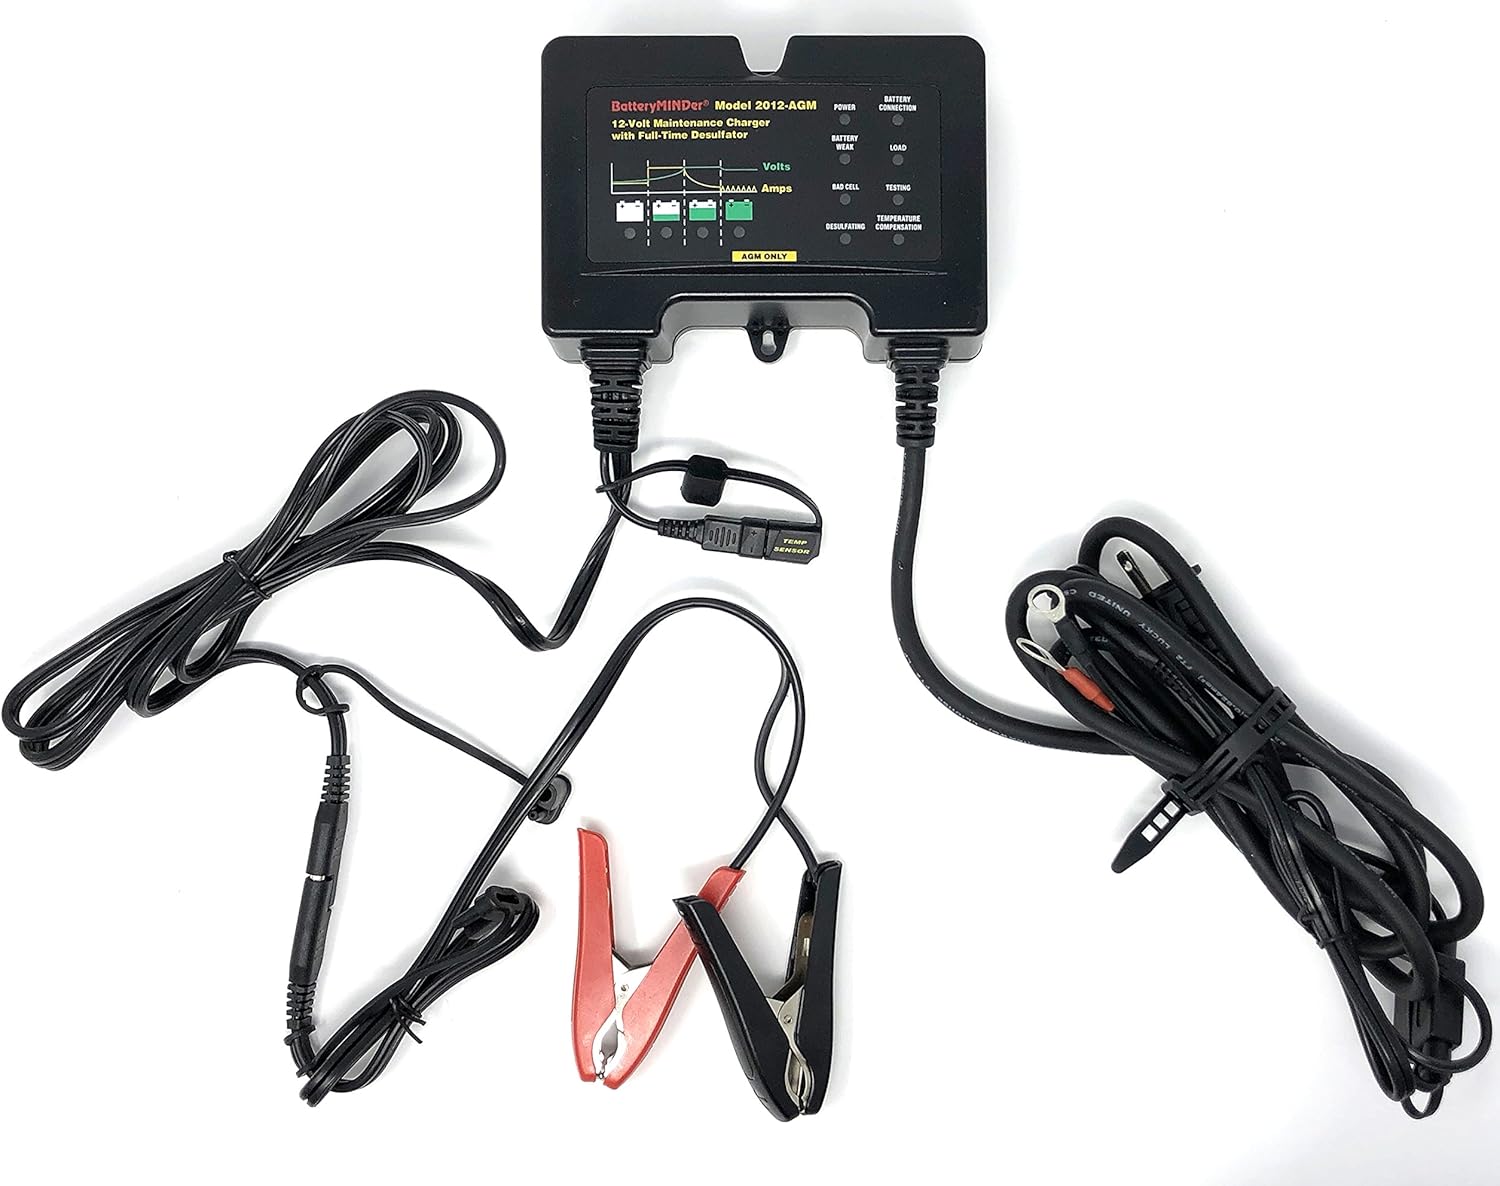
3. BatteryMINDer Model 2012 – Best for Long-Term Reconditioning
BatteryMINDer is a favorite among long-time battery maintenance professionals. It offers a pulse desulfation mode, temperature compensation, and full-time monitoring. While it charges slower due to lower amperage, it’s one of the best chargers for gradual restoration and maintenance.
Why It Stands Out:
Unique high-frequency pulse technology
Ideal for long-term battery storage and reconditioning
Excellent customer support and 5-year warranty
Best For: Users storing batteries for RVs, boats, or seasonal vehicles who want to slowly restore and maintain them over time.
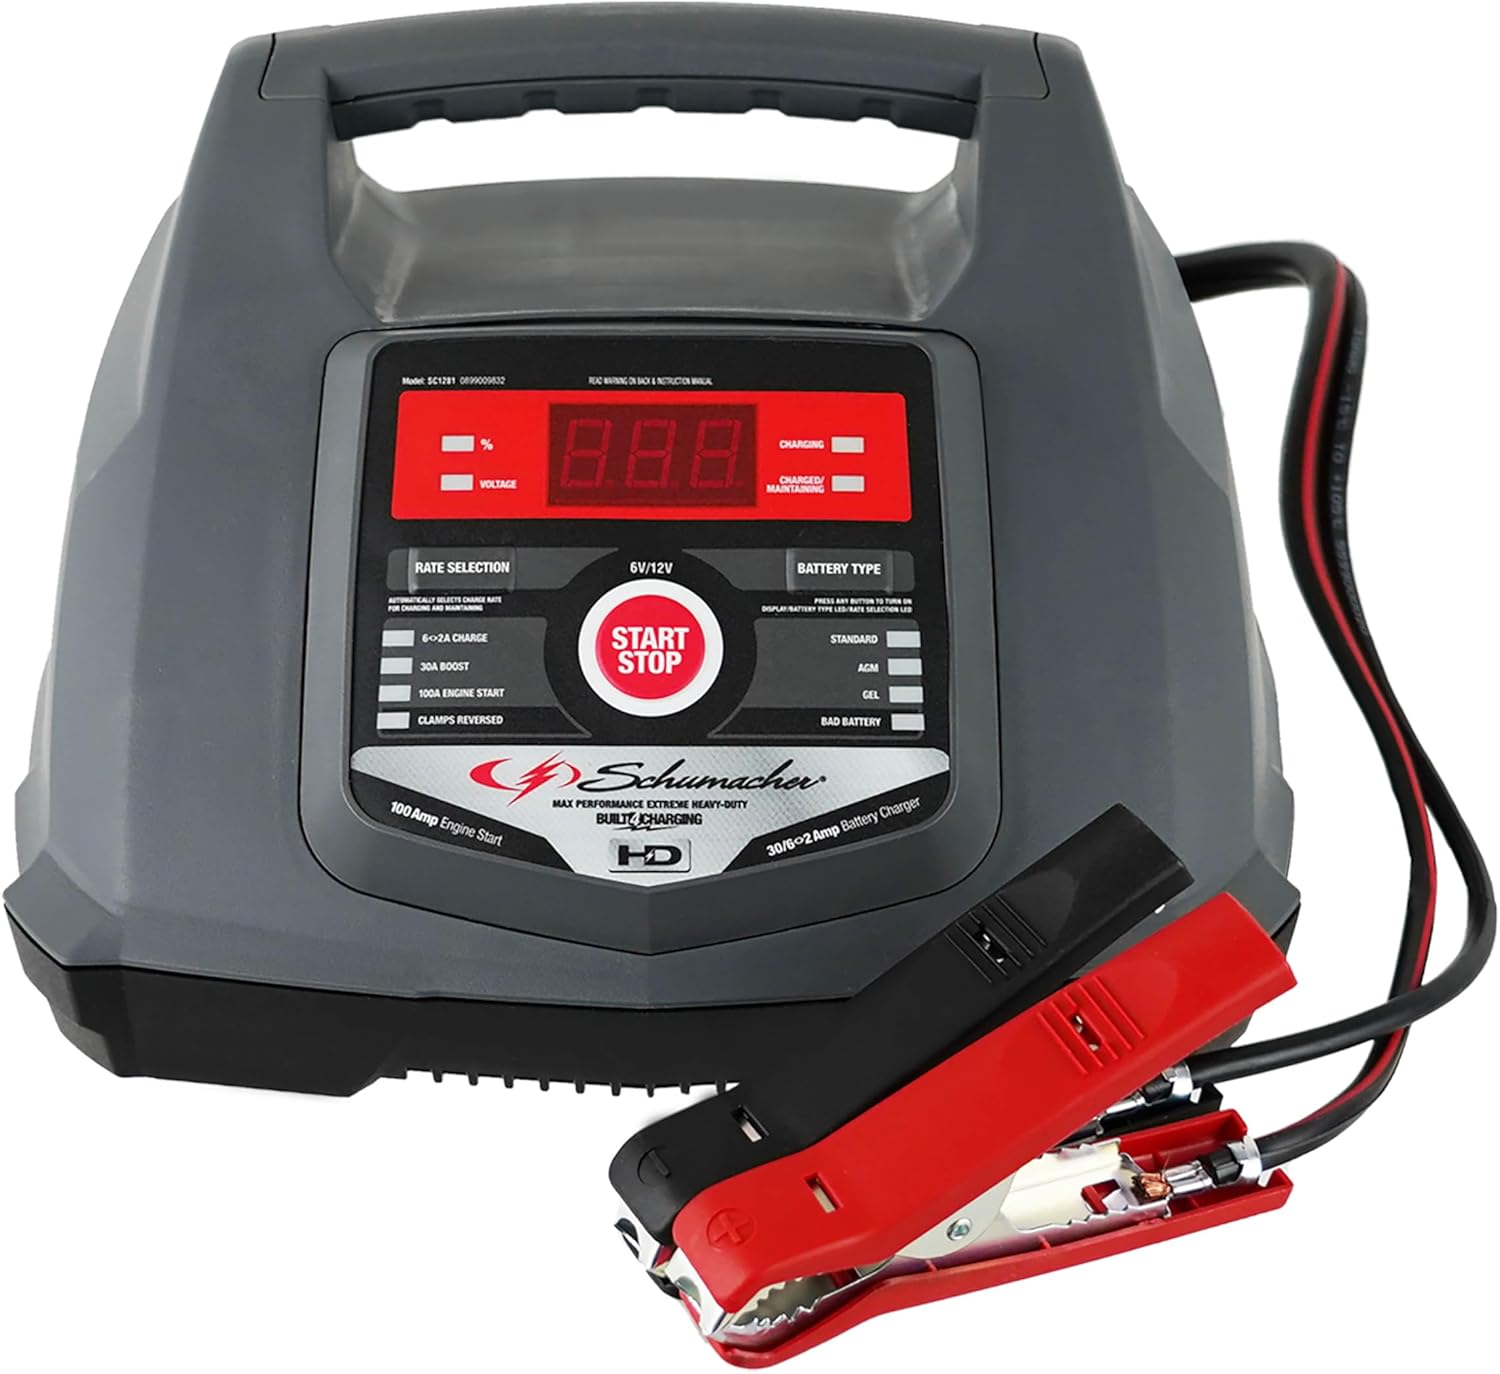
4. Schumacher SC1281 – Best Budget High-Power Charger
Schumacher is a trusted name in battery charging, and the SC1281 offers high power and versatility at an affordable price. While it’s not as advanced in reconditioning features as NOCO or CTEK, it still includes alternator testing, auto-voltage detection, and multi-stage charging, making it a solid budget option.
Why It Stands Out:
High amp output for faster charging
Can jump-start a dead battery in minutes
Suitable for large car and truck batteries
Best For: DIY users who want a versatile charger with decent battery recovery features without breaking the bank.
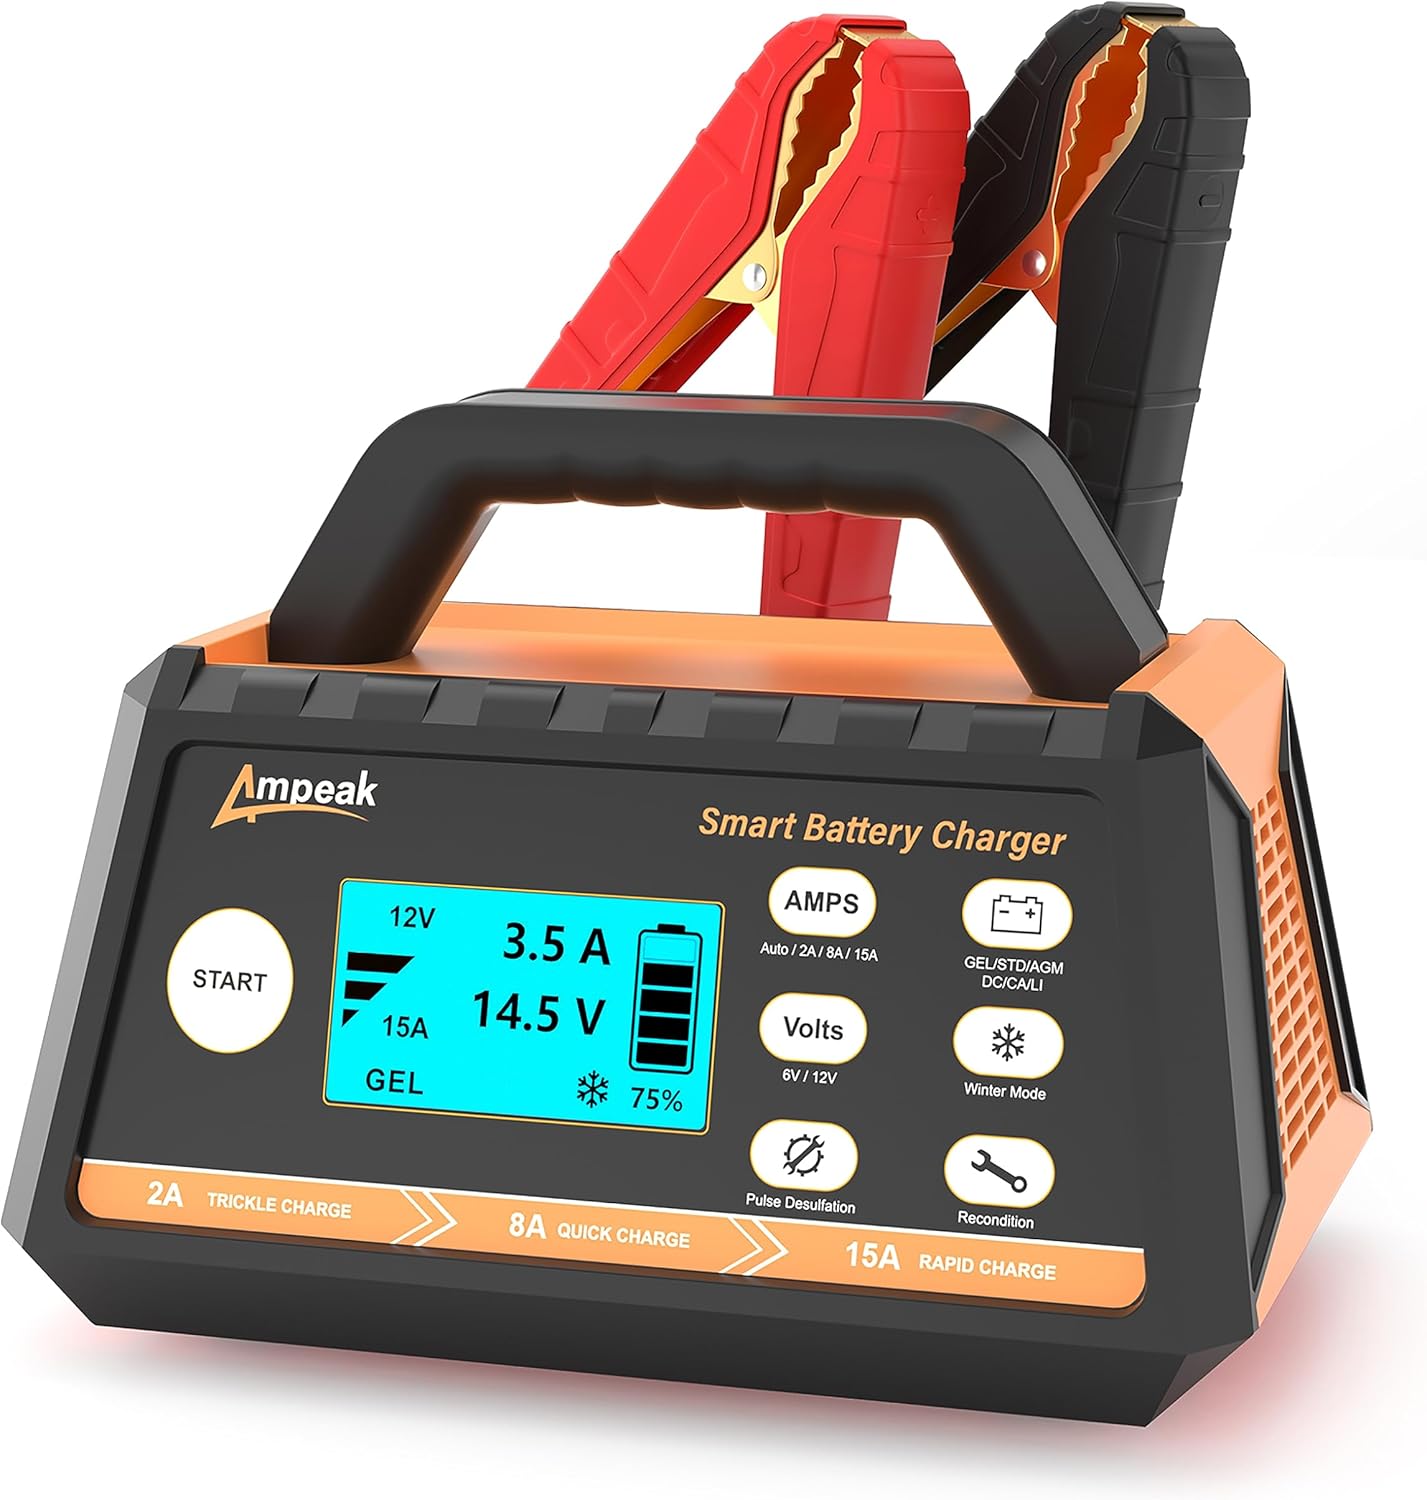
5. Ampeak Smart Battery Charger – Best Entry-Level Reconditioner
If you’re looking for an easy-to-use and affordable battery charger with reconditioning capabilities, the Ampeak Smart Charger is a solid option. It offers an automatic repair function, digital display, and multi-stage charging—all at a wallet-friendly price.
Why It Stands Out:
Excellent value for beginners
Automatic voltage detection and charge control
Repair mode for old batteries
Best For: New users and budget-conscious car owners who want a simple but effective way to revive their batteries.
Features to Look for in a Reconditioning Battery Charger
When shopping for the best charger to recondition car batteries, keep these features in mind:
Desulfation/Recondition Mode – Removes sulfate buildup from battery plates.
Microprocessor-Controlled Charging – Adjusts the charging process based on battery condition.
Multi-Stage Charging – Moves from bulk charge to absorption and float automatically.
Battery Compatibility – Supports AGM, gel, and flooded batteries.
Thermal Compensation – Adjusts output based on temperature to prevent overheating.
Safety Features – Includes reverse polarity protection, short-circuit protection, and spark resistance.
Display Panel – Shows voltage, status, and alerts in real time.
These features ensure your battery is charged safely and effectively while extending its overall lifespan.
Final Thoughts: Choosing the Best Charger for Reconditioning
Whether you’re trying to revive a weak battery or want to maintain your current one, investing in a quality battery reconditioning charger can save you time, money, and frustration. Models like the NOCO Genius10 and CTEK MXS 5.0 are excellent long-term solutions, while budget-friendly options like the Ampeak Smart Charger give you the basics without compromising safety.
If you’re serious about battery health, combine reconditioning with good maintenance habits—like regular voltage checks, terminal cleaning, and avoiding short trips—to keep your battery working like new.
Car Battery Maintenance Tips: How to Extend the Life of Your Battery
Car Battery Maintenance Tips
Your car’s battery is one of the most essential components under the hood. It provides the necessary electrical power to start your engine, operate lights, power accessories, and keep everything running smoothly. Unfortunately, it’s also one of the most commonly neglected parts when it comes to regular vehicle maintenance. With proper care and a few simple habits, you can extend the lifespan of your car battery and avoid being stranded with a dead engine.
In this article, we’ll explore the most effective car battery maintenance tips, backed by expert advice and practical steps that anyone can follow.
1. Understand the Basics of Your Car Battery
Before diving into maintenance tips, it’s helpful to know how your car battery works. Most vehicles use a 12-volt lead-acid battery, which consists of a series of cells filled with electrolyte solution. Over time, chemical reactions within the battery degrade its ability to hold a charge. By maintaining proper conditions and habits, you can slow this degradation and keep your battery performing at its best.
2. Keep Your Battery Clean and Free of Corrosion
One of the most overlooked aspects of battery maintenance is keeping the terminals clean. Corrosion often forms on the metal contacts of your battery, appearing as white, green, or bluish powder. This buildup interferes with the connection between your battery and the vehicle’s electrical system.
To clean corrosion:
Mix baking soda and water into a paste.
Use a wire brush or old toothbrush to scrub the terminals.
Rinse with clean water and dry thoroughly.
Apply petroleum jelly or dielectric grease to protect against future buildup.
Regular cleaning every few months can prevent voltage drops and improve starting performance.
3. Check the Battery Voltage Regularly
Monitoring your car battery’s voltage is key to understanding its health. Use a digital multimeter to check the battery charge. A fully charged battery should read between 12.6 and 12.8 volts when the engine is off. Anything below 12.4 volts indicates a partially discharged battery, and under 12 volts suggests it’s time to recharge or replace it.
For modern vehicles, some battery testers also check cold cranking amps (CCA) and overall condition, helping you catch issues early before your battery fails.
4. Limit Short Drives and Give the Battery Time to Recharge
Frequent short trips—less than 10 miles—don’t allow your battery enough time to fully recharge. Your vehicle’s alternator recharges the battery while the engine runs, but this process takes time. If your battery is constantly undercharged, sulfation builds up on the plates, leading to a shorter lifespan.
To avoid this:
Combine errands into longer trips.
Occasionally take your car on a longer highway drive.
Use a trickle charger or battery maintainer if you don’t drive often.
Especially during winter months or lockdown periods, using a battery maintainer can be the difference between a reliable vehicle and one that won’t start.
5. Secure Your Battery Properly
A loose battery can vibrate excessively while driving, damaging internal components and connections. This kind of stress can lead to short circuits, cracked casings, or acid leaks. Make sure your battery is tightly secured in its tray with the hold-down clamp properly in place.
When checking your battery, also inspect the tray and surrounding area for signs of rust or damage, which could affect the battery’s position.
6. Check the Electrolyte Level in Conventional Batteries
If you’re using a non-sealed lead-acid battery, you can inspect the fluid level inside each cell. This electrolyte level should be above the plates but below the cap openings.
To maintain the right level:
Carefully open the caps using a flathead screwdriver.
Top off low cells with distilled water only.
Avoid overfilling to prevent overflow during charging.
Never use tap water, as minerals can damage the battery’s internal chemistry.
7. Keep the Battery Away from Extreme Temperatures
Batteries are sensitive to temperature extremes. In hot climates, water can evaporate from the cells, leading to overheating. In cold climates, chemical reactions slow down, making it harder to start your car.
To protect your battery:
Park in a garage or shaded area when possible.
Use an insulated battery blanket in winter months.
Keep terminals covered with protective caps to reduce exposure.
If you live in an area with harsh winters or scorching summers, replacing your battery every 3–4 years is a smart preventative step.
8. Don’t Leave Lights or Electronics On
Leaving your headlights, interior lights, or infotainment system running while the engine is off can quickly drain your battery. Many newer vehicles have automatic shut-off features, but it’s still important to double-check before walking away.
Also, avoid charging your phone or running electronics with the engine off, as even small drains can affect the battery over time.
9. Perform a Monthly Visual Inspection
Take five minutes each month to visually inspect your battery. Look for:
Cracks or bulges in the casing
Loose or frayed cables
Leaking acid
Swollen sides or corrosion
Any of these signs suggest it’s time for service—or even replacement. Early detection of battery problems helps prevent sudden failure when you least expect it.
10. Replace Your Battery at the Right Time
Even with the best maintenance, every battery has a lifespan. Most car batteries last between 3 to 5 years, depending on usage, climate, and care. If your battery is nearing this age, especially if you’re noticing slow starts or dim headlights, consider replacing it proactively.
Have your battery tested during oil changes or tire rotations so you’re not caught off guard by a dead battery on a busy morning.
Final Thoughts on Car Battery Maintenance
Taking care of your car battery doesn’t require expensive tools or professional help—just regular attention and smart driving habits. By following these battery maintenance tips, you’ll reduce the chances of unexpected breakdowns, save money on premature replacements, and keep your vehicle running reliably in any season.
Whether you’re a daily commuter or a weekend driver, treating your battery with care is one of the easiest and most effective ways to ensure your car starts every time you turn the key.
Car Battery Reconditioning: Revive Your Battery Safely and Effectively
Introduction to Car Battery Reconditioning
Step-by-Step: DIY Car Battery Reconditioning
Car battery reconditioning, also known as battery refurbishing, is the process of restoring an old or “dead” car battery to extend its usable life. This typically involves desulfation – removing the lead sulfate crystals that build up on the battery’s internal plates over time.renogy.com. These sulfate deposits are a common cause of batteries losing the ability to hold a charge. By cleaning the sulfate off and replenishing the battery’s electrolyte, a reconditioned battery can regain a significant portion of its original capacity and function.
This practice has become popular among DIY enthusiasts not only because it can save money on buying new batteries, but also because it reduces waste. Instead of throwing out an old battery after it dies, you can often recondition it one to three times to bring back its performance carfromjapan.com. This means fewer batteries ending up in landfills and a longer period before you need a replacement.
Why is car battery reconditioning relevant? For one, car batteries are expensive to replace, so getting extra life out of them is financially smart. Reconditioning allows you to preserve and refresh the performance of your battery, potentially saving you a lot of money over time carfromjapan.com. Additionally, it’s an eco-friendly practice.
Discarded batteries are hazardous and hard to recycle; if they end up in trash bins, they can leak chemicals and heavy metals that harm the environment carfromjapan.com. By reconditioning and reusing batteries, we minimize toxic waste and the demand for new battery production. Overall, battery reconditioning appeals to the DIY mindset of fixing and reusing, supports global sustainability efforts, and can provide a reliable spare or backup battery for emergencies.
In the following sections, we’ll explain how to safely recondition a car battery step by step, discuss the pros and cons, dispel common myths, and wrap up with best practices for safe and eco-conscious battery maintenance.
How to Recondition a Car Battery (Step-by-Step Guide)
Reconditioning a car battery at home is doable with the right precautions and tools. Safety is paramount – you will be working with corrosive acid and potentially explosive gases, so always wear protective gear (safety goggles, rubber gloves, etc.) and work in a well-ventilated area. Make sure there are no open flames or sparks nearby when working on a battery, since charging batteries release hydrogen gas which is flammable.
Before starting, gather the equipment you’ll need, including a multimeter (to check voltage), a battery charger (ideally one with a slow or smart charge setting), a flathead screwdriver (for prying off cell caps), a small funnel, plastic buckets for holding fluids, baking soda (for cleaning and neutralizing acid), Epsom salt (magnesium sulfate, for the reconditioning solution), distilled water, and some old toothbrush or steel wool for cleaning terminals renogy.comrenogy.com. Once you have your gear and a battery that you suspect can be revived, follow these steps:
Step 1: Clean the Battery Terminals
Corrosion often accumulates on battery terminals and can impede the flow of electricity. Start by disconnecting the battery from the vehicle (always remove the negative cable first, then positive). Inspect the terminals for any white or bluish crusty deposits. To clean them, prepare a simple cleaning paste by mixing baking soda with a little distilled water in about a 2:1 ratio until it forms a thick paste renogy.com. Apply this paste to the terminals and clamps using an old toothbrush.
You should see a fizzing reaction as the baking soda neutralizes the acidic corrosion. Gently scrub the terminals to remove all the corrosion. For very stubborn corrosion, a bit of steel wool or a dedicated battery terminal brush can be used to scrape it off. Once the terminals are clean and shiny, rinse them with plain water to wash away any remaining baking soda, and dry them thoroughly with a towel. This ensures a good electrical connection later and also prevents any stray corrosion from contaminating your reconditioning process.
Step 2: Check the Battery’s Voltage
Before investing more time in the reconditioning procedure, it’s wise to test the battery’s current voltage to gauge whether it’s a good candidate for reconditioning. Use a multimeter set to DC volts. Connect the red (positive) probe to the battery’s positive terminal and the black (negative) probe to the negative terminal.
A healthy, fully charged 12V car battery typically reads about 12.6 volts or slightly higher. If your battery is reading somewhere between roughly 10V and 12.6V, it means the battery is partially discharged and likely suffering from sulfation – a prime candidate for reconditioning jdpower.com. On the other hand, if the reading is very low (for example, below 10 volts), that indicates the battery is deeply discharged and the sulfation may be too extensive to fully reverse.
In fact, readings under ~10V often imply a dead cell or heavy sulfate buildup that might be beyond recovery jdpower.com. In such cases, reconditioning might not succeed, and it may be safer to recycle the battery and replace it. Similarly, if the multimeter shows 0 volts, the battery could have an internal short-circuit carfromjapan.com, which cannot be fixed by reconditioning. Assuming your battery is in the reconditionable range (10–12.6V), you can proceed with the next steps.
Step 3: Remove the Battery Acid (Safely)
Carefully remove the battery from the vehicle (if you haven’t already) and place it on a sturdy workbench or on the ground. Now you will drain the old electrolyte (battery acid) from the cells. Most car batteries are flooded lead-acid batteries with removable caps.
Depending on the design, your battery may have six individual cell caps (for each 2V cell) or a pair of caps, or a sealed top under a plastic cover. Use a flathead screwdriver to pry off any plastic cover and then unscrew or pop open each cell cap renogy.com. Caution: The liquid inside is a sulfuric acid solution, which is highly corrosive and can burn skin or damage eyes/clothes carfromjapan.com. Make sure you’re wearing gloves and eye protection for this step.
With the caps off, carefully pour out the acid from each cell into a designated plastic bucket. Tilt the battery and drain as much liquid as possible into the bucket. It’s a good idea to have some baking soda on hand while doing this; if any acid spills on surfaces or skin, neutralize it immediately with baking soda and water.
Once the cells are emptied, neutralize the old acid by slowly adding a few tablespoons of baking soda into the bucket of liquid. The mixture will fizz as the acid is neutralized renogy.com. Give it a stir to ensure thorough neutralization. Disposal: The neutralized liquid must be disposed of as hazardous waste – do not pour it down the drain or on the ground. Seal the bucket and take it to a local recycling center or hazardous waste facility that accepts old battery acid and chemicals renogy.com.
Proper disposal is important for safety and environmental reasons. After draining, if your battery had a lot of sediment or crystal buildup visible inside, you’ve now removed the majority of the old electrolyte, setting the stage for cleaning and replenishing the cells.
Step 4: Clean the Battery’s Internal Cells
Even after pouring out the acid, some residue and lead sulfate crystals remain on the battery plates inside the cells. The next step is to flush and clean the cells to remove as much of this buildup as possible. Prepare a cleaning solution by mixing baking soda with distilled water (the same 2:1 ratio paste you made for the terminals works, but in a more liquid form). Using a small funnel, pour this baking soda solution into each of the battery’s cells until they are about 3/4 full renogy.com.
Be cautious not to overfill or spill. Once all cells have the solution, temporarily put the caps back on (or if it’s a cap strip, press it on loosely) and gently shake the battery. Rocking the battery back and forth or inverting it (while keeping caps on) for a couple of minutes helps the cleaning solution reach all internal parts of the cells renogy.com. The baking soda will neutralize any remaining acid and can help dislodge some sulfate deposits from the plates renogy.com.
After a few minutes of shaking, remove the caps again and carefully pour the now dirty cleaning solution out into your disposal bucket (it will contain neutralized acid residue). It may look discolored. For a thorough cleaning, you can repeat this rinse-and-shake process once more with fresh baking soda solution renogy.com. After the second rinse, drain the solution completely. Your battery’s cells should now be as clean as possible internally, free of most acidic residue.
Step 5: Add the Reconditioning Solution (Electrolyte)
Now that the battery is clean and empty, it’s time to refill it with a reconditioning electrolyte solution that will help break down sulfate crystals. The most common reconditioning fluid is a mixture of Epsom salt (magnesium sulfate) and distilled water.
Epsom salt is inexpensive and readily available; it can help restore the chemical balance inside a sulfated battery. To prepare the solution, dissolve approximately 4 ounces of Epsom salt in about half a gallon (roughly 2 liters) of warm distilled water renogy.com. In more convenient terms, that’s about 110–120 grams of Epsom salt in 1.8–2.0 liters of water (or roughly 1/2 cup of Epsom salt in a gallon of water; the exact proportions aren’t critical as long as the salt fully dissolves).
It helps to use hot distilled water and stir until the liquid turns clear, indicating the salt is completely dissolved renogy.com. Using the funnel, carefully pour this magnesium sulfate solution into each cell of the battery. Fill each cell until the fluid just covers the plates inside and reaches the level it normally would with standard electrolyte (usually there’s a “full” line on the side of the battery or you can gauge to about 1/2 inch below the cell cap opening). Do not overfill.
If your battery had a recommended fill level, aim for just below that. Once all cells are filled with the reconditioning solution, put the caps on loosely (they need to be open during charging, but we want to avoid splashes or contamination as we move the battery for charging).
Step 6: Slow Charge the Battery
The reconditioned battery now has fresh solution, but it’s essentially in a discharged state. To complete the reconditioning, the battery must be slowly charged to allow the new electrolyte to break down remaining sulfation on the plates. Use a battery charger (ideally a smart charger or one with a trickle/low-amperage setting). Connect the charger’s positive (red) clamp to the battery’s positive terminal, and the negative (black) clamp to the negative terminal. Keep the cell caps open during charging – this allows hydrogen gas to vent out and prevents pressure buildup.
Set your charger to a low charging rate, around 2 amps (or if it’s an automatic charger, use the slow charge or reconditioning mode if available). Charging at a low current is crucial; a fast charge could heat up the battery and won’t effectively reverse sulfation renogy.com. Let the battery charge for a long duration – typically 24 to 36 hours of continuous low-level charging is recommended renogy.com. This extended slow charge helps convert the lead sulfate back into active material on the plates and revives the battery’s capacity renogy.com.
During this period, periodically check the battery’s temperature by touch; it should stay just warm, not hot. If it’s becoming very hot to the touch or bubbling vigorously, stop the charging and let it cool (excessive heat can damage the battery). Also ensure the charging area is well-ventilated since hydrogen gas will be emitted. After the charger has been on for at least a full day (or longer, up to 36 hours), you can proceed to testing the battery.
Step 7: Test and Evaluate the Battery
After the lengthy charge, turn off and disconnect the charger. Now close up the battery by reinstalling all the caps tightly and wiping off any spilled fluid. It’s moment of truth time – use the multimeter again to check the battery’s voltage. A successfully reconditioned 12V car battery should read in the neighborhood of 12.4 to 12.6 volts at rest renogy.com, which indicates it is holding a charge effectively.
If your multimeter shows a value in this range, it’s a good sign the process worked. If the reading is still significantly below 12.4V, the battery may need a bit more charging – you could hook it back to the charger for another 12 hours and test again jdpower.com. Once the voltage looks good, you can do a simple functional test: Reinstall the battery in the car (or if it’s already in, ensure connections are snug and clean), then turn the ignition to accessory (without starting the engine) and switch on the headlights.
The headlights should shine brightly and not dim immediately. If they are extremely dim or fade quickly, the battery might not be holding load well and could indicate an issue despite the voltage reading. Assuming the lights are steady, go ahead and start the car. The engine should crank strongly if the battery is truly revived.
Note: It’s wise to keep an eye on the reconditioned battery’s performance over the next few days. Sometimes a battery might lose charge again if sulfation wasn’t fully cleared or if there are other underlying issues. But if it holds charge and starts the car reliably, congratulations – you’ve successfully reconditioned your car battery!
Pros and Cons of Battery Reconditioning
Like any DIY project or maintenance procedure, car battery reconditioning has its advantages and disadvantages. Here is a balanced look at the pros and cons:
Pros
Save Money: Perhaps the biggest benefit, reconditioning extends the life of your battery so you don’t have to buy a new one as soon. Car batteries are not cheap, so squeezing extra months or years out of an old battery can save you a significant amount of money carfromjapan.com. Many people have reported being able to reuse a battery for several additional years through periodic reconditioning carparts.com, delaying the cost of replacement.
Environmental Benefits: Reconditioning promotes reuse and reduces waste. Every battery that’s revived is one less battery being thrown away prematurely. Lead-acid batteries are toxic and can leak lead and acid into the environment if improperly disposed carfromjapan.com. By reconditioning, you help cut down on hazardous waste and the energy/resources needed to manufacture new batteries. It’s an eco-conscious practice that aligns with global recycling and sustainability efforts.
Learn Useful Skills: For DIY enthusiasts, the process itself is a learning experience. You gain knowledge about how batteries work, how to handle acids and electrical components safely, and you build confidence in auto maintenance. These skills can be applied to other projects (like maintaining solar power systems, off-grid battery banks, etc.).
Emergency Preparedness: Having the ability to recondition a battery can be useful in a pinch. If you or someone you know is stuck with a dead car battery and no immediate way to get a new one, reconditioning could revive the battery enough to get the vehicle running. Even as a temporary measure, it can be a lifesaver in remote areas or emergency situations where a replacement isn’t readily available.
Reduced Reliance on New Batteries: Reconditioning means you can keep using your existing battery longer, which reduces the demand for new battery production. This indirectly helps conserve resources like lead and reduce pollution from battery manufacturing. It’s a small personal step that contributes to a larger environmental impact.
Cons
Not Always Successful: Reconditioning isn’t a magic fix for every battery. If a battery is extremely old, has physical damage (e.g. warped plates, cracked case), or a shorted cell, you likely cannot restore it with these methods jdpower.comcarfromjapan.com. Some heavily sulfated batteries won’t regain much capacity even after treatment. In other words, there’s no guarantee your efforts will work each time.
Temporary Results: Even when reconditioning does work, the improvement in battery lifespan is often moderate, not permanent. Sources note that additives like Epsom salt might give a sulfated battery only a few extra months or maybe a year of service batteryuniversity.com. At best, you might restore a battery to around 70-80% of its original capacity the-diy-life.com, which is useful but not like getting a brand-new battery. Eventually, the battery will wear out for good. Think of reconditioning as extending the life, not resetting the clock entirely.
Safety Hazards: There are inherent risks in handling batteries. You’re dealing with corrosive acid and flammable hydrogen gas. Without proper precautions (gloves, goggles, ventilation), one could get injured from acid burns or even risk a battery explosion. The process also involves electricity (during charging), so there’s a shock hazard if done carelessly. Due to these hazards, some people might not be comfortable attempting it. Always prioritize safety and if you’re unsure, it may be better to seek professional help.
Time and Effort: Reconditioning a battery is not a quick task. The step-by-step process (cleaning, draining, refilling, charging) can span several hours to a couple of days (with the 24+ hour charging period being the longest part). It’s not as simple as a quick jump-start or swap-out; it requires patience, preparation, and cleanup. If your time is very limited, you might consider whether the effort is worth the money saved.
No Modern Batteries or Maintenance-Free Types: The methods described apply mainly to traditional flooded lead-acid batteries. Many modern car batteries are “maintenance-free” (sealed) or AGM (absorbed glass mat) types, which don’t have accessible fluid to drain or refill. Attempting to open sealed batteries can be difficult or void warranties.
So, reconditioning is mostly feasible for older-style batteries where you can access the cells. If you have a sealed battery, your options for DIY reconditioning are limited (at most, slow charging or using specialized desulfation devices).
Proper Disposal Still Needed: Even after reconditioning, if a battery is not significantly improved, you’ll need to dispose of it. That means handling hazardous waste and making a trip to a recycling center. You cannot just throw a lead-acid battery in the trash. The extra step of proper disposal is a responsibility that comes with attempting reconditioning if the battery ultimately fails.
Despite these cons, many DIYers find that the pros outweigh the drawbacks, especially for moderately sulfated batteries that respond well to the process. It’s important to go in with realistic expectations – you might get a good outcome, but it’s not guaranteed, and you must always prioritize safety.
Common Myths and Facts About Car Battery Reconditioning
With the rise in popularity of battery reconditioning (and various guides or “miracle fix” products on the internet), a number of myths have also sprouted up. Let’s clear up some common misconceptions by pairing them with facts:
Myth:“Reconditioning a battery will restore it to like-new condition indefinitely.” Fact: Reconditioning can restore some capacity, but usually not 100%, and not forever. A successfully reconditioned battery might regain most of its charge capacity, but typically around 70-80% is more realistic the-diy-life.com. It will eventually degrade again with use. In short, you’re prolonging the battery’s life, not making it brand new. Some sources claim a battery could last several more years after reconditioning carparts.com, but actual results vary widely. Expect improvement, not perfection or permanence.
Myth:“Any dead battery can be reconditioned.” Fact: Unfortunately, not every battery can be saved. If a battery has a broken internal connection, a shorted cell, or has been sitting totally discharged for a very long time, reconditioning might not work. For instance, if the open-circuit voltage is below about 10 volts, the sulfation damage is usually too severe jdpower.com. And if a battery reads 0 volts, it likely has an internal short carfromjapan.com – no amount of cleaning or charging will fix that. Reconditioning is most effective on batteries that are sulfated but not physically damaged or completely worn out.
Myth:“Battery reconditioning is just the same as recharging a battery.” Fact: Reconditioning goes beyond a normal recharge. While it includes charging, it also involves draining the old electrolyte, cleaning the cells, and adding a special solution to break down sulfate buildup renogy.com. Simply charging a battery (especially with a standard charger) won’t remove large sulfate deposits. Reconditioning is a more in-depth process aimed at restoring the battery’s chemistry, not just topping up its charge.
Myth:“You need expensive equipment or professional tools to recondition batteries.” Fact: The process uses fairly common tools and materials. As outlined earlier, the required items are things like a household battery charger, a multimeter, basic wrenches/screwdrivers, protective wear, baking soda, distilled water, etc.renogy.comrenogy.com. The only somewhat specialized item is the charger (and many car owners already have one or can borrow one).
You don’t need industrial machines; in fact, many commercial “reconditioning machines” are essentially controlled chargers. There are also inexpensive desulfator devices on the market, but they are optional. In short, DIY reconditioning is accessible to anyone with the patience and basic toolkit.
Myth:“Battery reconditioning is dangerously unsafe.” Fact:When done with proper precautions, reconditioning is reasonably safe. The risks mainly involve acid and flammable gas, which are manageable. By wearing gloves and eye protection, working outdoors or in a ventilated area, and keeping open flames/sparks away, you mitigate the dangers carfromjapan.com. Millions of car owners perform routine battery maintenance (like checking electrolyte levels or cleaning terminals) which involves similar risks
. Reconditioning is an extension of that maintenance. That said, the concern behind this myth is valid – if someone ignores safety guidelines, accidents can happen. So it’s important to treat the process with respect and follow recommended safety steps strictly. If you do so, there’s no reason a careful DIYer can’t recondition a battery safely at home.
Myth:“It’s a scam – battery reconditioning doesn’t really work.” Fact: There’s plenty of evidence and firsthand experience to show that battery reconditioning does work in many cases. The scientific principle of dissolving lead sulfate crystals to recover battery capacity is well established renogy.com. However, the effectiveness varies. Some people may have tried on batteries that were beyond hope or used incorrect methods, leading them to think it’s all a hoax.
The truth is, when applied to a suitable battery (one that is sulfated but not physically ruined), reconditioning can significantly improve performance. It’s not a “scam” or pseudoscience – but it’s also not a miracle cure that works every time. As long as you approach it with the understanding that results differ from battery to battery, you can appreciate that reconditioning is a legitimate technique for battery maintenance.
Myth:“You can use tap water or any salt for reconditioning.” Fact: Only distilled water should be used in batteries, because minerals in tap water can contaminate the cells and cause further damage carfromjapan.com. Likewise, Epsom salt (magnesium sulfate) is the most commonly recommended additive for reconditioning because it’s effective at desulfation and relatively safe for the battery’s chemistryrenogy.com. Other salts or substances (e.g. some old myths mention adding aspirin, etc.) are not proven and can actually harm the battery. Stick to the standard advice of distilled water and Epsom salt for best results, or in some cases specialized chemical additives designed for batteries.
By separating the facts from fiction, you can avoid unrealistic expectations and unsafe practices. Battery reconditioning is a useful technique, but it must be done correctly and understood in context.
Conclusion: Revive Responsibly and Stay Eco-Conscious
Car battery reconditioning is an excellent example of how a bit of knowledge and effort can turn would-be waste into a useful resource again. In this guide, we’ve defined what battery reconditioning is and walked through how you can do it yourself – from cleaning the terminals and checking voltage, to safely replacing the electrolyte and charging the battery back up.
We’ve also examined the benefits (like saving money and reducing pollution) as well as the limitations and risks. The key takeaway is that while you can often breathe new life into a tired battery, you should always do so safely and with realistic expectations. Not every battery will be saved, but many can be, giving you additional months or even years of service the-diy-life.com before a full replacement is needed.
As you embark on reconditioning, remember to prioritize safety: wear your protective gear, work in the right environment, and handle all chemicals and tools with care. Dispose of any old battery acid or failed batteries properly – it’s not just about personal safety, but also about protecting our environment from toxic waste.
If done correctly, reconditioning is not only rewarding (bringing a “dead” battery back to life feels great!) but also a small yet meaningful step toward sustainable, eco-friendly DIY practices.
In summary, car battery reconditioning is a valuable skill for any DIY enthusiast’s toolkit. It empowers you to maintain your equipment, save resources, and reduce your environmental footprint. By following the proper steps and precautions, you can revive your car’s battery safely and effectively. Just be sure to recondition responsibly – stay informed, stay safe, and enjoy the benefits of giving your car battery a second chance at life. Happy tinkering, and drive safe with your rejuvenated battery!
Testing Car Batteries Before Reconditioning: Here Is My Step-by-Step Guide
Testing Car Batteries Before Reconditioning
Testing Car Batteries Before Reconditioning: Reconditioning a car battery can be a smart and cost-effective way to restore its performance and extend its lifespan. However, not all batteries are suitable for reconditioning. That’s why testing car batteries before reconditioning is a critical step. Without proper testing, you risk wasting time and energy on a battery that’s beyond repair. This guide will walk you through the exact steps to determine if your car battery can be successfully revived.
To test a car battery before reconditioning, start with a visual inspection for cracks or leaks. Use a multimeter to check voltage—healthy batteries read 12.6V or more. Next, attempt a slow charge to see if it accepts power. Perform a load test to check voltage under stress and, for flooded batteries, use a hydrometer to measure electrolyte health. If the battery passes these checks and holds a charge, it may be suitable for reconditioning.
1. Understand Why Testing Is Important Before Reconditioning
Before attempting to recondition any battery, it’s essential to determine whether the battery still has the structural integrity and potential capacity to benefit from the process. Testing car batteries before reconditioning ensures safety, helps you avoid unnecessary labor, and confirms whether the battery still holds enough charge or can accept one. If the battery is deeply damaged, reconditioning may be dangerous or ineffective.
2. Perform a Visual Inspection
The first step in testing car batteries before reconditioning is a thorough visual check. Examine the battery case for cracks, swelling, corrosion, or leaking fluid. Any physical deformity is a sign that the battery should not be reconditioned. Swollen or leaking batteries are hazardous and must be properly disposed of. Check the battery terminals for corrosion and ensure they are not loose or damaged. Surface-level issues can be cleaned, but major defects make reconditioning unsafe and unwise.
3. Measure the Voltage with a Multimeter
After the battery passes the visual test, it’s time to check the voltage using a multimeter. Set the multimeter to DC voltage and touch the red probe to the positive terminal and the black probe to the negative terminal. A fully charged battery should read between 12.6 and 12.8 volts. If the reading is between 12.0 and 12.5 volts, the battery is moderately discharged and may benefit from reconditioning. If the voltage is between 10.5 and 11.9 volts, the battery is deeply discharged but still has a chance to recover. Readings below 10.5 volts suggest the battery is heavily sulfated, making reconditioning more difficult and less likely to succeed.
4. Testing Car Batteries Before Reconditioning Attempt a Slow Charge Test
Next in the process of testing car batteries before reconditioning is attempting a slow charge. Use a smart charger or a manual charger with a low amp setting, ideally around 2 amps. Connect the charger and monitor whether the battery accepts the charge. If it does, this is a good sign that the internal plates are still functional. If the battery refuses to accept a charge or the voltage rapidly drops after being disconnected from the charger, it is likely beyond recovery. This step is essential because it tests the battery’s ability to hold and receive energy, a key requirement for reconditioning.
5. Conduct a Load Test
The load test simulates how the battery performs under real conditions. This is one of the most important steps when testing car batteries before reconditioning. Use a battery load tester or a specialized automotive battery analyzer. First, charge the battery as much as possible. Then, apply a load equal to half the battery’s cold cranking amps (CCA) rating for about 15 seconds. Observe the voltage during the load. If the voltage stays above 9.6 volts, the battery is likely strong enough to be reconditioned. If it drops below 9.0 volts, it indicates significant degradation, and reconditioning may not be effective.
6. Use a Hydrometer to Test Electrolyte Levels (Flooded Batteries Only)
If you’re testing a traditional flooded lead-acid battery, a hydrometer can provide additional insight into each cell’s specific gravity. This test tells you how well each individual cell is functioning. Open the battery caps carefully and insert the hydrometer into each cell. A specific gravity reading between 1.265 and 1.299 indicates a fully charged cell. Readings below 1.200 suggest the cell is weak. If one or more cells show significantly lower readings than others, the battery may be internally damaged, making it a poor candidate for reconditioning. Make sure to wear gloves and eye protection when handling electrolyte fluid.
7. Check for Internal Resistance Using a Battery Analyzer
More advanced testers can measure a battery’s internal resistance. High internal resistance reduces the battery’s ability to deliver current, even if voltage levels seem adequate. When testing car batteries before reconditioning, this is a key factor often overlooked. High resistance usually results from sulfate buildup or degraded internal plates. If resistance is significantly above the battery’s normal range (usually less than 5 milliohms for most car batteries), reconditioning may not restore the battery to functional use.
8. Evaluate the Battery’s Age
Age is another important factor when testing car batteries before reconditioning. Most car batteries last between three and six years, depending on use and maintenance. If the battery is older than five years and shows weak test results, it is often not worth the time and effort to attempt reconditioning. Newer batteries with moderate sulfation are typically better candidates for revival. You can find the battery’s manufacture date printed on a label or stamped into the casing.
9. Monitor Temperature During Testing and Charging
Temperature plays a significant role in battery performance. If a battery becomes hot during testing or while receiving a slow charge, it may have internal shorts or damaged cells. Overheating during the reconditioning process can be dangerous and is a clear sign that the battery should not be reconditioned. Always monitor the battery temperature during testing and make sure it stays within a safe range, generally under 120°F (49°C).
10. Make a Final Decision Based on All Test Results
Once all testing is complete, combine your observations to make a final decision. If the battery has no physical damage, holds a charge above 11.5 volts, passes a load test, and maintains stable internal resistance and electrolyte levels, it is likely suitable for reconditioning. However, if multiple tests show failure—especially in voltage, load, or temperature stability—then replacement is the safer and more practical solution. Testing car batteries before reconditioning helps ensure that your efforts are spent only on batteries that have a realistic chance of recovery.
Testing Car Batteries Before Reconditioning Final Thoughts
Testing car batteries before reconditioning is a step that should never be skipped. Proper testing can save you hours of work and help you avoid attempting to revive a battery that is beyond repair. It also ensures that the reconditioning process is safe and effective. By following the right steps—from visual inspections to voltage and load tests—you’ll be equipped to make smart decisions about which batteries can be brought back to life and which are ready for recycling. Whether you’re working on a personal vehicle or multiple batteries as part of a battery reconditioning business, these tests are foundational to success.
We use cookies on our website to give you the most relevant experience by remembering your preferences and repeat visits. By clicking “Accept”, you consent to the use of ALL the cookies.
This website uses cookies to improve your experience while you navigate through the website. Out of these, the cookies that are categorized as necessary are stored on your browser as they are essential for the working of basic functionalities of the website. We also use third-party cookies that help us analyze and understand how you use this website. These cookies will be stored in your browser only with your consent. You also have the option to opt-out of these cookies. But opting out of some of these cookies may affect your browsing experience.
Necessary cookies are absolutely essential for the website to function properly. This category only includes cookies that ensures basic functionalities and security features of the website. These cookies do not store any personal information.
Any cookies that may not be particularly necessary for the website to function and is used specifically to collect user personal data via analytics, ads, other embedded contents are termed as non-necessary cookies. It is mandatory to procure user consent prior to running these cookies on your website.